Inflammation – The Root Cause To Most Disease (part 1)

Most always inflammation begins in the gut!

inflammation

  • Inflammation controls our lives. From the first bump on the head to chronic digestive stress inflammation is a leading indicator something is afoot.
  • Inflammation is an essential part of the immune system, chronic inflammation is not. Chronic inflammation harms the body instead of healing it, as it simultaneously destroys and heals tissues that cause the immune system to overexert itself.
  • It has become increasingly obvious that chronic inflammation is the main cause of many chronic illnesses. Heart disease, obesity, ADD/ADHD, dental issues, thyroid issues, migraines, diabetes, many cancers, and Alzheimer’s disease, are a few off the top of my head.
  • Inflammation is recognized as redness, heat, swelling and pain. It is a natural healing response to bring nourishment and immunity to an injury or infection. When the inflammation continues and refuses to go away, it causes illness.
  • Some of the things that contribute to inflammation include: stress, lack of exercise, dietary choices, genetics, exposure to toxic secondhand tobacco smoke, prescription drugs like steroids, OTC drugs like NSAID’s (non-steroidal anti-inflammatory drugs!) and heavy metals.
  • Learning how to adjust dietary choices is one of the best ways to deal with chronic inflammation. Not only is this a safe choice, food is something your body recognizes and eating the right organic, soothing, cooling, anti-inflammatory foods heals and cleanses you from the inside out.
  • If you are living with chronic inflammation, digestive discomfort, bloating, arthritis and have low energy, fear not!! There is so much you can do to turn your life around and get your balance back.
  • FIRST TIP IS TO STOP EATING SUGAR in all forms!!!

The Anti-Inflammatory Smoothie!

Preparation Time: 5 minutes
Serves: 2

Ingredients

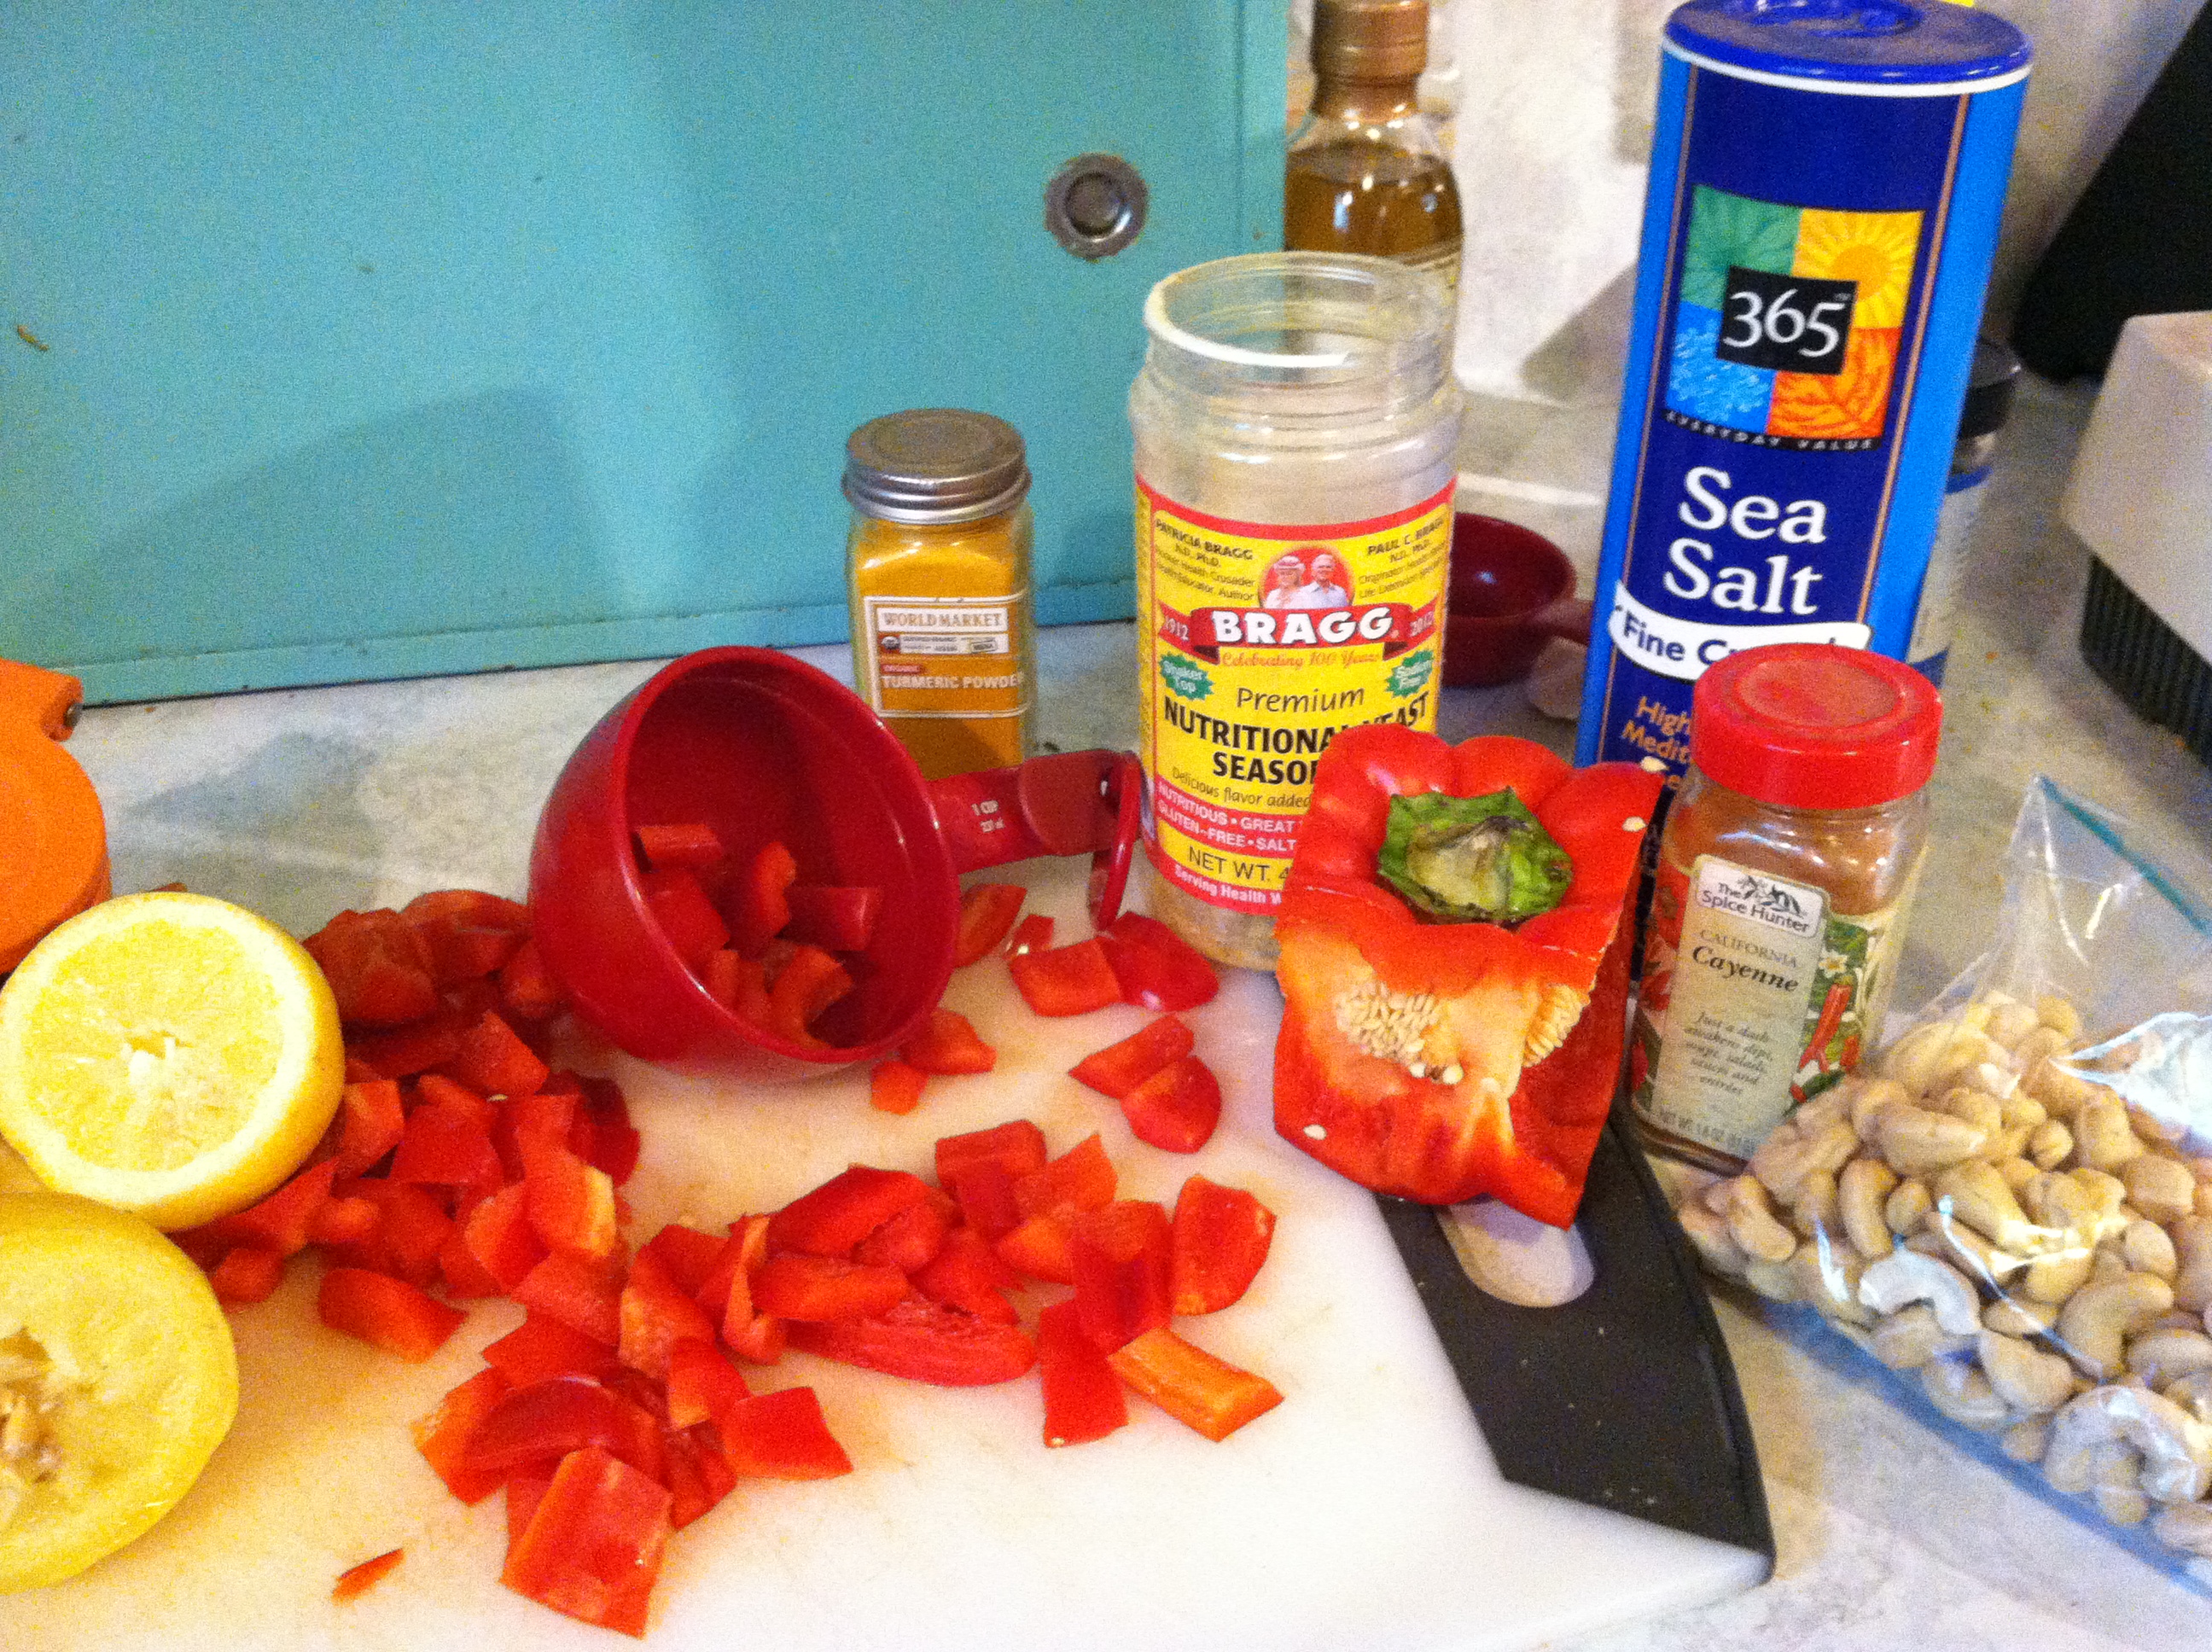
1 inch of fresh ginger, gratedturmericsmoothie
1 inch of fresh turmeric, grated
Handful of baby spinach
Handful of watercress (or rocket/arugula)
1 small soft avocado
1/2 capsicum
Big handful of flat-leaf parsley and/ or coriander
1 cup coconut water (or filtered water)
Big pinch of cayenne
Pinch of unprocessed sea salt

Instructions

  1. Grate the roots into the blender and add the avocado and coconut water
  2. Blend this to form a base
  3. Next add the remaining ingredients and blend until smooth

As with all days pay attention to what you are putting in your mouth….. this greatly impacts your health, your life and your mood!

Be well my friends and I am here to empower you on your journey of great self love!!

Jennifer

Peanut Butter Cookies

peanut_butter_cookiesIngredients:
* 1 cup of raw almond flour
* 1/2 cup of organic, fresh peanut butter (or almond butter)
* 1 cup pitted Medjool dates (soaked in warm water for 10 minutes)
* 1 1/4 teaspoons of vanilla extract
* ¼ teaspoon cinnamon
* 1 handful of cacao nibs (optional)

▪ Sea salt to garnish

Directions:
• Combine almonds, nut butter, dates, cinnamon and vanilla in a food
processor and blend until a dough-like texture is achieved (a couple
of minutes). Add more nut butter if necessary to make the dough
stickier.

Optional: Add cacao nibs and process on pulse for 15-20 seconds to break them up a little but still leave some whole.

• Form into small balls and use a fork to press down and create a
crisscross pattern

• Sprinkle with sea salt

• Store in refrigerator (better the next day!)

Pomegranate and Rice Medley Stuffing

Makes 8 half-cup servings.
———-
Ingredients

• 2 tsp extra virgin olive oilfarro
• 1 cup chopped celery
• ½ cup orange pepper, chopped (can substitute red or yellow pepper)
• ½ cup uncooked brown rice
• ½ cup uncooked wild rice
• ½ cup dried pomegranate seeds
• 1 tsp dried basil
• 2 Tbsp fresh chopped parsley OR 1 tsp dried parsley
• 3 cups low-sodium vegetable broth
• ½ cup chopped roasted almonds
• Freshly ground pepper to taste

Directions
Heat olive oil in a roasting pan (4 qt or larger) over medium heat. Add chopped celery and chopped orange pepper and cook, stirring often, until softened (3 to 5 minutes). Add brown rice and wild rice, stir until coated with olive oil, just 30 seconds. Add broth and bring to a boil; reduce heat, simmer and cook covered, 35 minutes.

At 35 minutes, remove lid and stir in basil and dried pomegranates. Simmer, covered, until most of the liquid has been absorbed, about 10 more minutes. Add black pepper to taste. Fluff with a fork and sprinkle chopped roasted almonds on top, or allow guests to sprinkle almonds per serving.

Note: May be made two days ahead and stored in sealed container in the refrigerator. Reheat by placing Pomegranate and Rice Medley Stuffing in lightly-oiled glass baking dish, add 2 tablespoons water, and warm at 300 degrees for 20 minutes or until heated through.

Souper Squash Soup

Ingredients
8 – 12 servings

1 large butternut squash
1 small sweet potato
1 small onion
½ head of cauliflower, chopped
8 cups of vegetable stock
1 Tbsp Olive oil
Sea salt – a pinch/ or to taste
Cinnamon – a pinch/ or to taste
Maple syrup – a “swirl” / or to taste

Directions
1. Preheat oven to 375ºF.
2. Peel butternut squash and sweet potato. Cut into 2” slices. (Deseed squash)
3. Place in baking dish with olive oil, salt, and cinnamon.
4. Roast in oven for about 20-25 minutes, turn slices over and continue cooking for about 20 more minutes until soft. (Also a great dish as is)
OR EASY VERSION: Pierce whole sweet potato and butternut squash with fork, so the steam will escape, and bake about 45 minutes or until tender. Scoop out contents, deseed squash and set aside.
5. Sauté onions, cauliflower and sea salt in oil on medium heat until soft.
6. Add chicken or vegetable stock. Bring to a boil.
7. Add cooked butternut squash and sweet potato.
8. Cook at medium heat for 10 minutes, lower heat and continue to simmer for 10 more minutes.
9. Puree soup with an immersion (hand-held stick) blender.
10. Add sea salt, and cinnamon to taste
11. Swirl maple syrup into puree
12. Mix again briefly with an immersion blender.
13. Serve and Enjoy!
14. For fancy serving, top with a swirl of maple syrup and sprinkle of cinnamon into each bowl.

Cooking Italian Senza Gluten

Italian food is the first thing I turn to as my comfort food of choice. One thing that I missed the most when making the gluten free lifestyle change was Italian food! It is my mission to be able to introduce you to healthy substitutions that will help you stay on this new found pathway to a healthier you. This recipe is a fun way to try new things and realize how delicious spaghetti squash is and how having such a versatile substitution for gluten-laced pasta can change your outlook!

ImageImageSlide3Slide4Image

Curry Kale, Cabbage and Cranberry Slaw (now that’s a tongue twister!)

This recipe is on the large scale of things. I make a huge bowl and use it with just about everything through the week. The taste marinates as it ages, in fact it tastes better each day!

Also please try to use organic ingredients at all times for your health and the health of whomever you are feeding. Preventing illness now may save you from paying 10 times more down the road with our broken “healthcare” (I can hardly say that without cracking up) system.

Ingredients:

Image

2 Bunches Kale (I’m not partial, whatever kind is freshest) with large vein removed

1/2 head purple cabbage

1/2 head green cabbage

6 – 8 Carrots

1 Cup Veganaise (I use the soy free one)

1 TBSP Curry Powder (plus more for fine tuning your own)

1 tsp Nutmeg

1 tsp Cinnamon

1/2 tsp salt (optional)

1 – 2 tsp black pepper (and more to taste)

1 bag (about a cup) of dried cranberries (the more the better in my opinion)

2 TBSP Braggs Apple Cider Vinegar

2 TBSP fresh oregano

2 TBSP or more fresh Cilantro

1 TBSP fresh Thyme

1/2 Cup Hemp hearts, chopped walnuts or raw cashews


In a food processor shred the organic kale and cabbage. Change the blade to the grater and grate carrots.

Place in a large bowl along with the fresh herbs, cranberries and nuts and toss with your hands until the mix looks beautiful.Image

In a separate small bowl put veganaise and spices and mix well. You can taste your dressing and add more to it or wait until you have mixed it with you kale mix.

It is an art to mix this together because you have so much fresh shredded stuff but keep going nice and slow until the veganaise mixture is evenly shared with the greens. Add your apple cider vinegar and mix well.

Image


What I look for as far as taste goes I want to know what I’m eating so I like to taste my greens and I to blend well with the curry and other spices. It usually takes me a few extra shakes of curry and nutmeg and I will always add a bit more apple cider vinegar because I could drink the stuff (in fact I do, mixed with water!) and then I put it in the ref. for at least 30 minutes to let the juices flow together.  

I use it with everything in sandwiches, on salads, as a side dish and often as a mid day snack all by itself; its very versatile and healthy.

The brain healthy spices in this slaw are: cinnamon, oregano, thyme, curry

Carrots and cranberries are on the list of the 50 best brain foods.

You will also receive a boost in protein since kale packs quite a protein punch! Hope you enjoy this and will make it your own in time.

As with all posts Eat, Heal and LIVE with Jennifer!

Easy Organic Vanilla Gluten-Free Cake

Ingredients

  • 1/4 cup organic coconut oil
  • 1/2 cup soy free earth balance
  • 1/3 cup organic sugar or honey
  • 4 organic free range eggs
  • 2 tsp. organic vanilla
  • 1/2 cup organic almond milk
  • 1 1/2 cups almond Flour
  • 1/2 cup organic coconut flour
  • 2 tsp. organic baking powder
  • 1/4 tsp. Himalayan Salt

Cream the shortening and sugar until smooth. One at a time add the eggs until each is fully blended with the sugar mixture. Add Almond Milk and Vanilla and blend a bit more.

In a separate bowl combine flours, baking powder and salt and gently fold together.

While liquid mixture is on low speed slowly add large heaping spoonfuls of flour. Mix each spoonful thoroughly before adding the next, this ensure a lighter fluffier cake! Without the gluten proper mixing has a huge impact on helping with the heaviness of the flours used.

Grease and flour a 13 x 9 pan. Spread cake mixture evenly. This is a thin cake kind of like a brownie. The flavor can accommodate any topping of your choice, I prefer fruit with melted cacao or you could use cashew cream and strawberries.

Chocolate Drizzle

  • 1 – 2 chunks raw cacao
  • 1 chunk raw cacao butter
  • 1 handful chocolate chips (with at least 50% cacao)
  • Sliced fruit of season right now its bananasImage

Delish Cashew Cheese for Organic Kale Chips

3 bunches kale ( I prefer to mix the different types)
4 cups raw cashews soaked overnight
2 cups chopped red pepper
1 Cup Nutritional Yeast or more to your taste
1 tsp. Sea Salt or more if needed
1 tsp + to taste Black Pepper
Juice of 2 lemons
Cayenne pepper to taste
Water around a 1/4 cup – enough to make it a nice creamy cheese

Image

Cut stalks from 3 bunches of kale and set aside
Put all of the remaining ingredients in a food processor and blend to a cheese consistency – 4 – 5 minutes. I add the water last and adjust until I think its the right consistency to schmeer on the kale. I taste as I go to determine the final amount of spices needed. If it tastes bland add more nutritional  yeast, salt, pepper or cayenne.  (I also add turmeric) It should be a nice nutty rich thick cheesy sauce and will fill the whole food processor!

Image
In a separate bowl place 1/4 of the kale halves and add 1/4 of the cheese mixture. To mix this is not a dainty job you must really mix and squeeze the kale and cheese mixture. You want to thickly coat the kale with a good layer of the mix. The more you squeeze it together the better your chips will be. Don’t worry you will not damage the kale!
Spread fully loaded kale gently on your dehydrator sheets and repeat the processes 3 more times until all your kale is used and your dehydrator shelves are full. I fill all 5 shelves with the chips. I put it on medium heat for about 6 hours and check on their crispiness. Then turn it down on low for a few more hours to ensure they are truly dried.Image
Then I proceed to pig out and enjoy the bags of goodness. Make sure not to close them in a baggie until they have cooled.

Make You Own Wood Cleaner

As I walk down the cleaning isle in any store but a health food store the smells and chemicals give me a headache right away and I try not to breathe. Now I’m supposed to buy this stuff to clean my house right? And yet I feel sick standing with the unopened containers of all these “household cleaners” wondering which is the lesser evil. I know there are more environmentally friendly cleaning products and even those have me wondering if maybe I can do something myself. So I decided to launch my workshop series Healthy Homes Heal,  which takes us to a deeper level of evaluating all that is going into our daily health including the products we use to keep our homes clean.

I think one of the best ways to change our lifestyle is one step at a time. If we have too many things to change all at once it is overwhelming and it is hard to know what exactly is helping with making you feel better. Lets start comfortably with one simple new healthy non-toxic product and remove the old more toxic one! Sounds easy enough to me and so that is the goal for the first of this series.

Home Remedies are things I love because its like chemistry class at your kitchen table and you get to choose what to make. When you start to embrace YOUR POWER and realize the things your put in your body (by feeding or simply through absorption or inhalation) have an impact in how you feel, only then can you control your health with simple things like eating organic foods, using less toxic cleaning supplies and avoiding toxicity like hanging out while your friends smoke cigarettes. Image

Ok now onto making your own Wood Dressing and watch your wood become alive!  What you’ll need is an empty clean spray bottle I used a 32oz. one and used every drop throughout the next two days feeding and cleaning any wood in site. I used it on my beautiful antique dressers, my floors, my mahogany doors and jambs and even my untreated outdoor wood furniture! My furniture and floors look different two days later, they are richer in color and feel smooth and satiated I guess could be the word!

Wood Dressing:

1 32 oz. empty spray bottle

2 cups Olive Oil preferably produced in the USA

2 cups white vinegar

80 drops doTerra Wild Orange Oil or Lemon (I cannot attest for the purity of any other essential oil on the marketplace nor would I recommend using on your furniture)

Put all ingredients together in bottle and shake well. Be warned you will want to feed everything in sight! Shake bottle before each spray as the oils and vinegar will separate.

Another note once you apply this to your wood floors let it seep into the grain, wipe off excess if you feel you must . The floor can be slippery for about a half hour until it is absorbed please be careful not to slip while it dries. Use soft clean cloth for your furniture and the same principle applies here if there is excess wipe off with a clean cloth although you will find that most of your wood is starving and will drink in all this pure food!

As with all things in life love what you are doing NOW!

EAT….HEAL…..LIVE!

Quick Gluten-Free Vegan Pizza

This is a quick and easy way to make use of what you have in your garden or your fridge. Pizzas are the most forgiving thing because most things taste great heated together with a bit of cheese (Diaya not dairy) and bread! When I’m in a pinch and do not feel like making everything from scratch I use Almond Glory pizza crust. They are in the frozen gluten-free section at my local whole foods. What I like most about these crusts they can handle some serious weight and you cook them in the little black plates they come in so clean up is very easy.

On this pizza I put a bit of organic marinara sauce and then two flavors of Diaya Cheese (Mozzarella and Pepper-jack shreds) Then from my garden I cut up a sweet onion and a hippy looking heirloom roma tomato that is green and red and from my fridge some crimini mushrooms. That’s all! Prep time 5 minutes 10 if you have to pick your veggies from out back.

Toss this little baby in the oven at 425 for 20 – 30 minutes depending how crispy you like your crust and viola gluten-free vegan goodness! While in the oven you have time to whip up a little salad and dinner is delish, healthy and no animals products were used!As with all things in life go easy on yourself, the planet and don’t forget my mantra

Eat, Heal, Live!